All posts tagged Vinyl
I know I should be putting up a post about Thanksgiving this week but I am just so excited about Christmas this year I am just gonna skip right on over it and get the countdown going! I created the “Days til’ Christmas” sign using the Winter Frolic Cartridge for the font out of silver vinyl and Winter Lace cartridge for the snow flakes out of white paper. The stripes of green paper and the white snow flakes are all Bazzill Basics.


The area to write the days on is a large circle of chalk board vinyl and we’ll count the days down with chalk.

Happy crafting xoxo. Follow me on Twitter I am Lab5 and on the Lovely Lula Facebook Page

The DVR is killing me. I record everything now. Feeling a little spoiled when I go to watch a show and can’t fast forward through commercials because it isn’t recorded and HGTV is my obsession. If the short people don’t interrupt and ask for a show of their own. I often watch Design on a Dime and mock a little because really some of their projects are just ugly. So I thought why not show a simple way to make a painting for your bare walls that is fun and functional and not splatter paint!
I took an inexpensive canvas from the art supply store and treated it with layers to make a great piece of art.

1. I started by painting the canvas all one color using acrylic paint, allow it to dry fully.
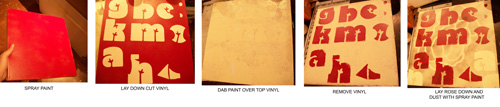
2. I spray painted a loose spotty paint over top in a contrasting color.
3. I used my Cricut to cut letters out of sticker vinyl (in this case I used Birds on Parade Cartridge) I laid those letter down on top of the canvas and dabbed a third color of paint over top, this time a lighter color, covering the letters, I allowed this to dry and then peeled the letters off to revel the color underneath.
4. I then used the YUDU to screen printed several sheets of card stock using a hand drawn patterns. I used those screen printed sheets to cut a large rose shape on the Cricut using the Sophie Cartridge, which is a Cricut Circle exclusive.
5. I flipped the rose shape upside down and lightly spray painted a dusting of black onto the canvas.
6. I flipped the rose over with the screen printing facing out and I added a few pieces of the vinyl that had been removed, to different areas on the canvas.
7. Finally I used shellac to hold the whole thing in place.
Allow to dry and you are done with a great piece of art to hang on your wall!


Happy crafting xoxo. Follow me on Twitter I am Lab5 and on Face Book under the Lovely Lula page.
I found a simple but inspiring square galvanized metal for that was screaming to become a planter box. I knew I wanted to play with the Cricut® Autumn Celebrations Cartridge for this one because there was a fun Day of the Dead* image on it. I cut the layers of of the skull image out of different colors of vinyl on my Cricut. Once those layers were in place I edged the metal box with masking tape that has a black background and glow in the dark dots. I enhanced the dots with the YUDU glow in the dark ink. I then used Ranger Inkssentials Enamel Accentsin black and white to dot the rest of the image. I allowed it to fully dry and then placed a miniature pepper plant inside.


I also made a greeting card out of the extra pieces. I like to cut several of the shapes incase soemthing happens in the cutting and that way I have extras to make cards out of. Here is the card, it also has glow in the dark ink on it:

Happy crafting xoxo Cyndi aka Lovely Lula Follow me on Twitter I am Lab5.
*Day of the Dead (Spanish: DÃa de los Muertos) is a Mexican holiday. The holiday focuses on gatherings of family and friends to pray for and remember friends and family members who have died. It is particularly celebrated in Mexico, where it attains the quality of a National Holiday. The celebration takes place on November 1st and 2nd, in connection with the Catholic holidays of All Saints’ Day (November 1) and All Souls’ Day (November 2). Traditions connected with the holiday include building private altars honoring the deceased using sugar skulls, marigolds, and the favorite foods and beverages of the departed and visiting graves with these as gifts.
The other day I was at a grocery store and saw a display for Halloween Candy and thought “whoa it’s way too early for that!” I went home and thought more about it and the desire for Halloween, my favorite holiday, crept in. So I too surrendered, with the full knowledge that it’s still just August but why not start making goodies for Halloween? So with the new Cricut Hello Thursday Chic and Scary Cartridge I grabbed my Cricut vinyl in Raven Black, black T-Shirt yarn and an old beat up piece of barn wood and created a “BEWARE” sign. I love it and I love when I can make things that are both Chic and Scary!


Happy crafting xoxo. Follow me on Twitter I am Lab5.
This month I grabbed the new Country Fair Cartridge and took a liking to the rooster weather vain. I thought it would make a cute country sign. I used a piece of corrugated metal for the background and I cut the rooster out of a red and white printed sticker vinyl and solid red sticker vinyl. I am giving this to my sister for her cute store The Cactus Corner.


Happy crafting xoxo Cyndi aka Lovely Lula. Follow me on Twitter I am Lab5.