All posts tagged Color

Scientists discover a new blue (see article HERE) and Crayola has jumped on the bandwagon and is inviting the public to name the new blue because the scientists chose YinMn (pronounced “yin-minâ€) and well it’s not so catchy!

Unleash the power of your creativity! Submit your Name Ideas for the new blue crayon and be entered for a chance to win a $100 Crayola Prize! Enter HERE


Fearless Family Home House Tour
Name: Cyndi Coon
Location: Tempe, Arizona
Size: 1,800 square feet
Years lived in: 13 years; owned
Cyndi’s home, a ranch-style house built in 1958, is a stunning ode to all things found, reclaimed, and vintage. It’s a home you can stare at for hours: peering into glass-fronted cases, admiring collections of ceramics, and wondering at the story behind each object. It’s about as far away from childproofed as you can get. Nevertheless, it’s home to two girls both under the age of eight.
The DVR is killing me. I record everything now. Feeling a little spoiled when I go to watch a show and can’t fast forward through commercials because it isn’t recorded and HGTV is my obsession. If the short people don’t interrupt and ask for a show of their own. I often watch Design on a Dime and mock a little because really some of their projects are just ugly. So I thought why not show a simple way to make a painting for your bare walls that is fun and functional and not splatter paint!
I took an inexpensive canvas from the art supply store and treated it with layers to make a great piece of art.

1. I started by painting the canvas all one color using acrylic paint, allow it to dry fully.
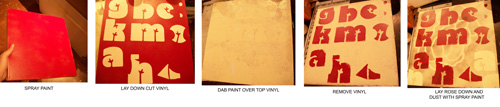
2. I spray painted a loose spotty paint over top in a contrasting color.
3. I used my Cricut to cut letters out of sticker vinyl (in this case I used Birds on Parade Cartridge) I laid those letter down on top of the canvas and dabbed a third color of paint over top, this time a lighter color, covering the letters, I allowed this to dry and then peeled the letters off to revel the color underneath.
4. I then used the YUDU to screen printed several sheets of card stock using a hand drawn patterns. I used those screen printed sheets to cut a large rose shape on the Cricut using the Sophie Cartridge, which is a Cricut Circle exclusive.
5. I flipped the rose shape upside down and lightly spray painted a dusting of black onto the canvas.
6. I flipped the rose over with the screen printing facing out and I added a few pieces of the vinyl that had been removed, to different areas on the canvas.
7. Finally I used shellac to hold the whole thing in place.
Allow to dry and you are done with a great piece of art to hang on your wall!


Happy crafting xoxo. Follow me on Twitter I am Lab5 and on Face Book under the Lovely Lula page.
This was the short one’s Christmas present on Christmas morning. It is a 2 foot x 3 foot canvas painted pink and screen printed, using the YUDU, with a castle from the Once Upon a Princess Cartridge and the Cricut. I added embellishments along the top out of felt and a ribbon notion and I added in felt trees to the sides of the castle. We just recently saw the movie Tangled about Rapunzel so I decided to make her blond hair cascade down from the tower window, this was made by pulling apart yarn and tying a bow. The short one was so thrilled that we had to stop everything and hang it up in her room above her bed.

For the complete tutorial click here: Princess Wall Hanging How To
Happy crafting xoxo Lovley Lula